As a part of your EADN (EPLAN API Developer Network) partnership with EPLAN GmbH & Co. KG, you get the opportunity to sign your software interface with our products. This allows you (or your customer) to use API assembly without having an EPLAN API developer license on his workstations. Instead, he receives – through you – a runtime license for an API interface.
This chapter describes how you (or your developers) should proceed, to get properly signed EADN modules.
At first there should be clarified why signing is necessary. There are 2 kinds of API licenses:
a) API developer license. It should be used only for development and testing of an API interface. Normally it has a limitation of a maximum size of EPLAN projects to 5 pages.
Only unsigned API programs can be loaded using it.
b) API runtime license. In this case there can be used only signed API programs, so we need to sign it. The routine how to do it is described bellow.
A user can check available licenses and select one by starting EPLAN with shift key (then the Select license dialog will appear).
When EPLAN is already running, current license can be retrieved from:
a) dialog About EPLAN
b) in API by EplApplication.License property and License class.
EADN / API Runtime signing uses a concept of combining standard .NET strong naming with additionally including an EPLAN license option to the software.
To achieve this combination, please follow the instructions in this chapter.
After you have concluded your EADN contract or purchased an API Runtime license and you created a new software interface with EPLAN, the main administrator of your EPLAN cloud organization will get informed about a new entitlement for using the cloud-based EADN Signing service. Additionally, you will receive a file containing the public part of a standard signature key, normally used for strong-naming a .NET assembly. We created this key especially for your software.
For using the EPLAN-Cloud based signing service, you have to be member of the regarding organization and got assigned the role User to the application EADN Singing:

Take the following steps to get your application EADN / API Runtime-signed:
In your software projects, you need to add an additional attribute to your AssemblyInfo files of all the assemblies, which are referencing EPLAN API Assemblies. The EplanSignedAssemblyAttribute is implemented in the Eplan.EplApi.Starter.dll, which you always have to reference in your API application. The following example shows how to use the attribute in your AssemblyInfo file:
| C# |
Copy Code
|
|---|---|
using System.Reflection; using System.Runtime.CompilerServices; using System.Runtime.InteropServices; using Eplan.EplApi.Starter; //.. [assembly: EplanSignedAssemblyAttribute(true)] |
|
The easiest way for delay signing your assemblies (DLL or exe) is entering the public key file in the signing properties of your software projects in Visual Studio. Check Sign the assembly and activate the Delay sign only flag. See the following image:

The delay signing is done, when building the software project and with it creating the assembly.
Alternatively, you can use Microsoft's Assembly Linker "Al.exe" to manually delay sign assemblies. Please refer to respective MSDN documentation.
Log in to the EPLAN Cloud Developer Portal https://developer.eplan.com
Notice:
EPLAN Cloud account required to access the developer portal.
As an old alternative to the "Upload files manually" step, you can use the outdated but still working method of uploading via EPLAN File Exchange. For this see "Outdated process: Using the EPLAN File Exchange".
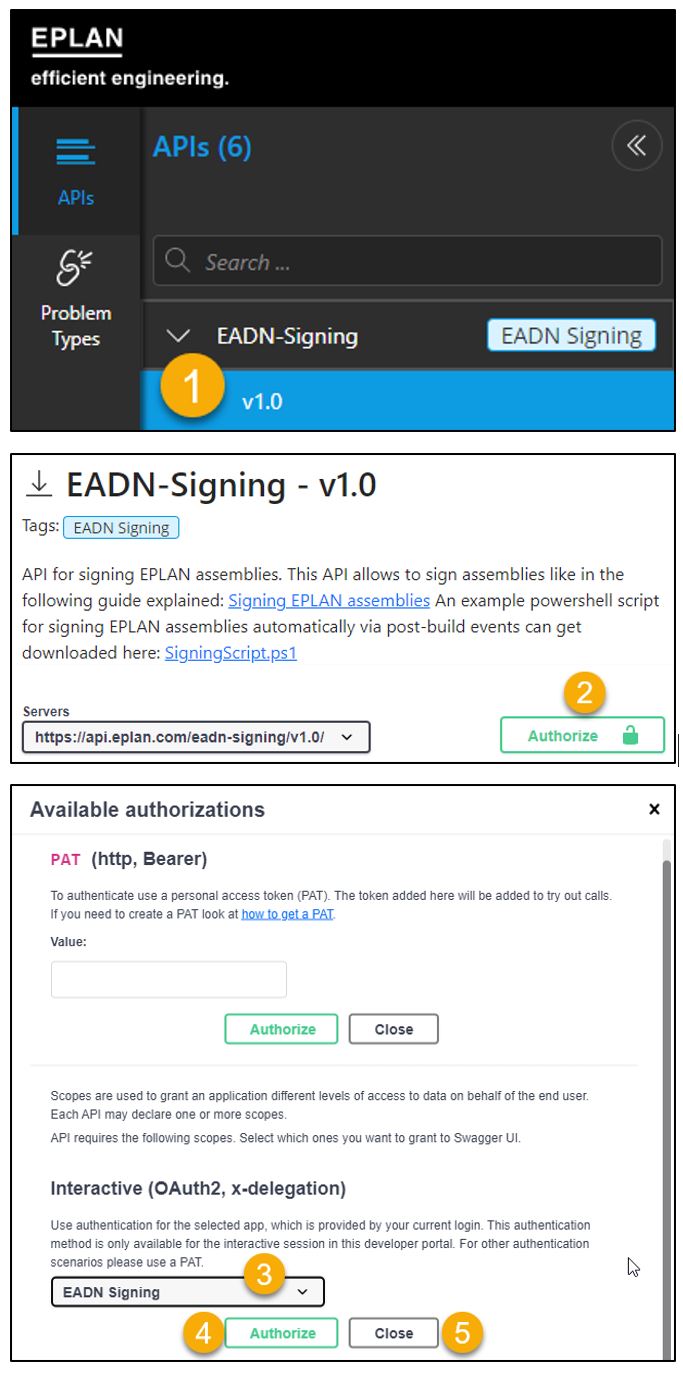
Authorize manual usage of EADN-Signing

Log in to the EPLAN Cloud Developer Portal https://developer.eplan.com
If required, perform Authorize manual usage of EADN-Signing.
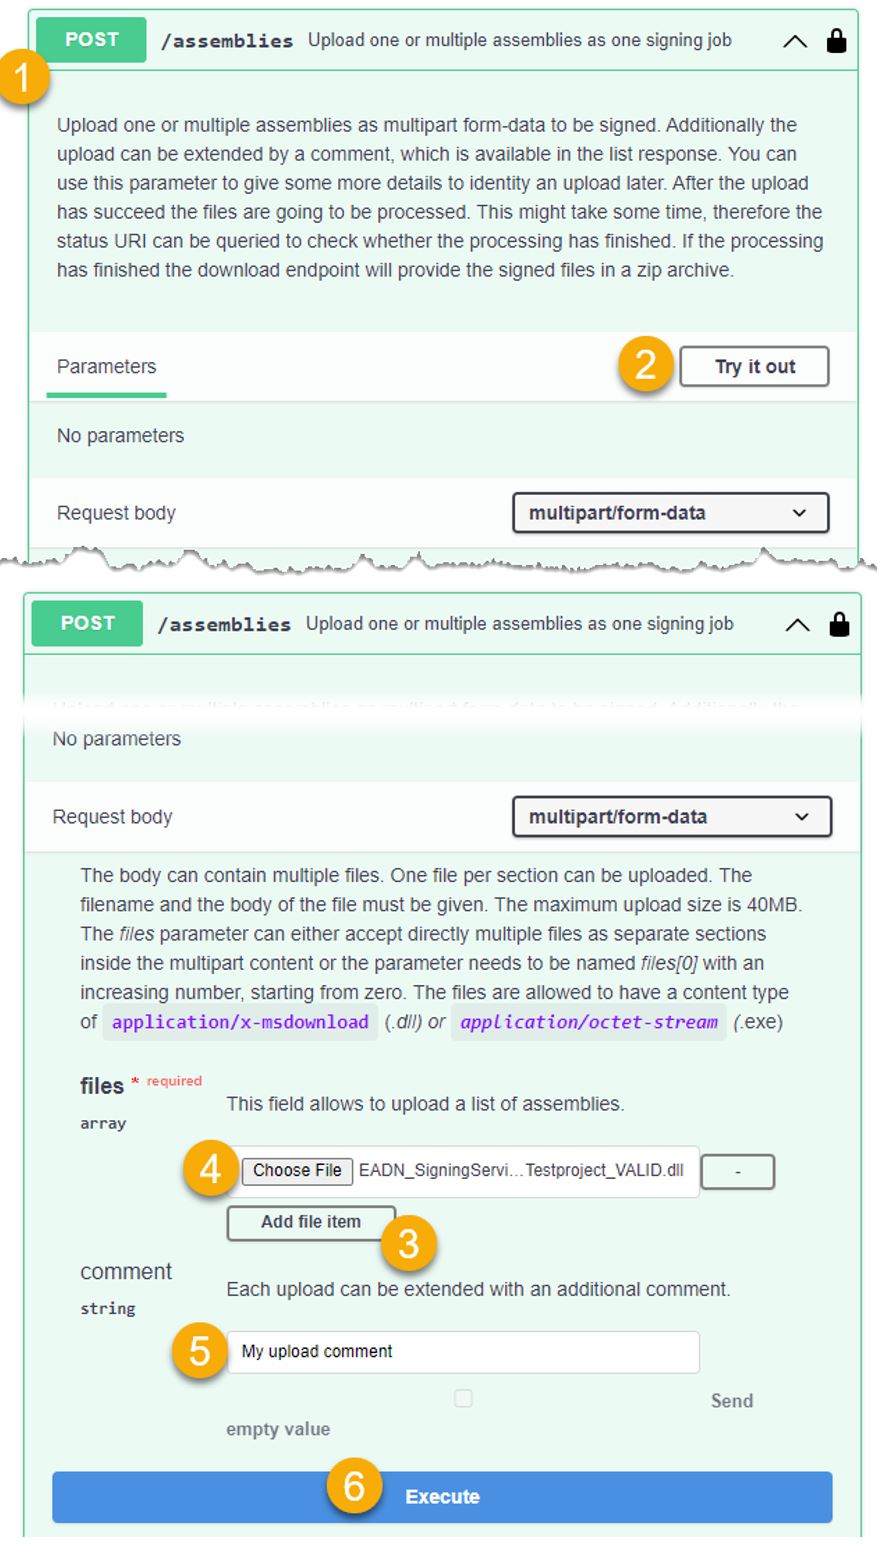
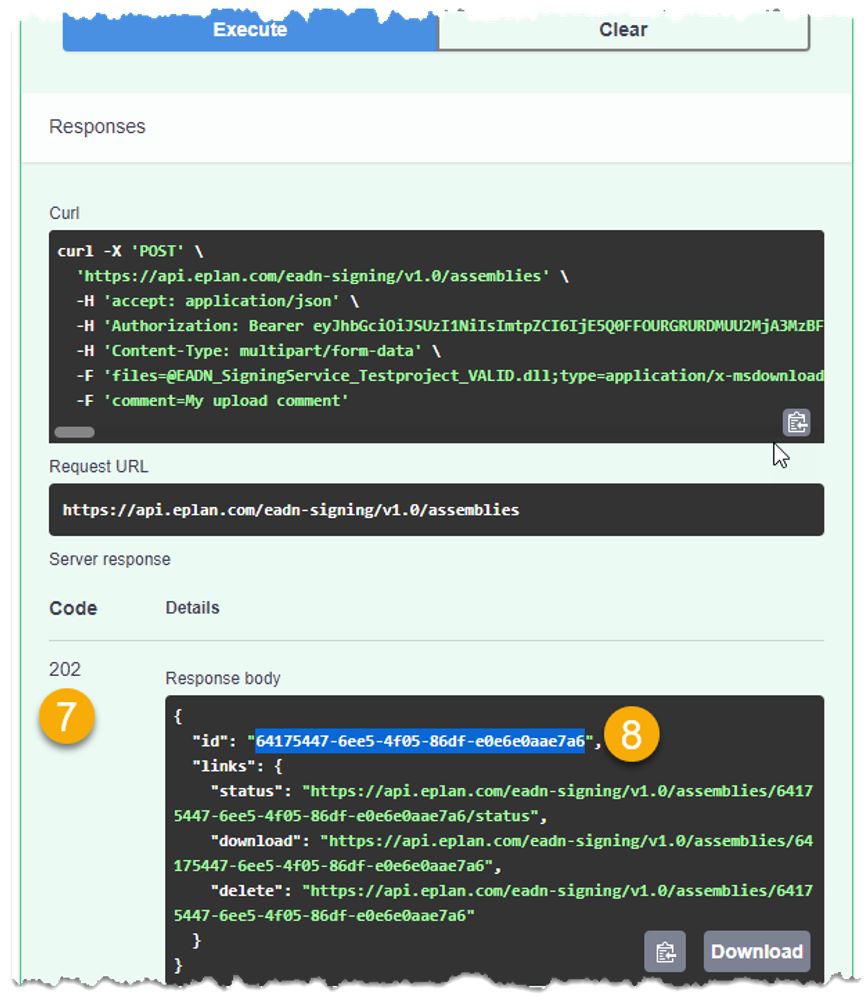
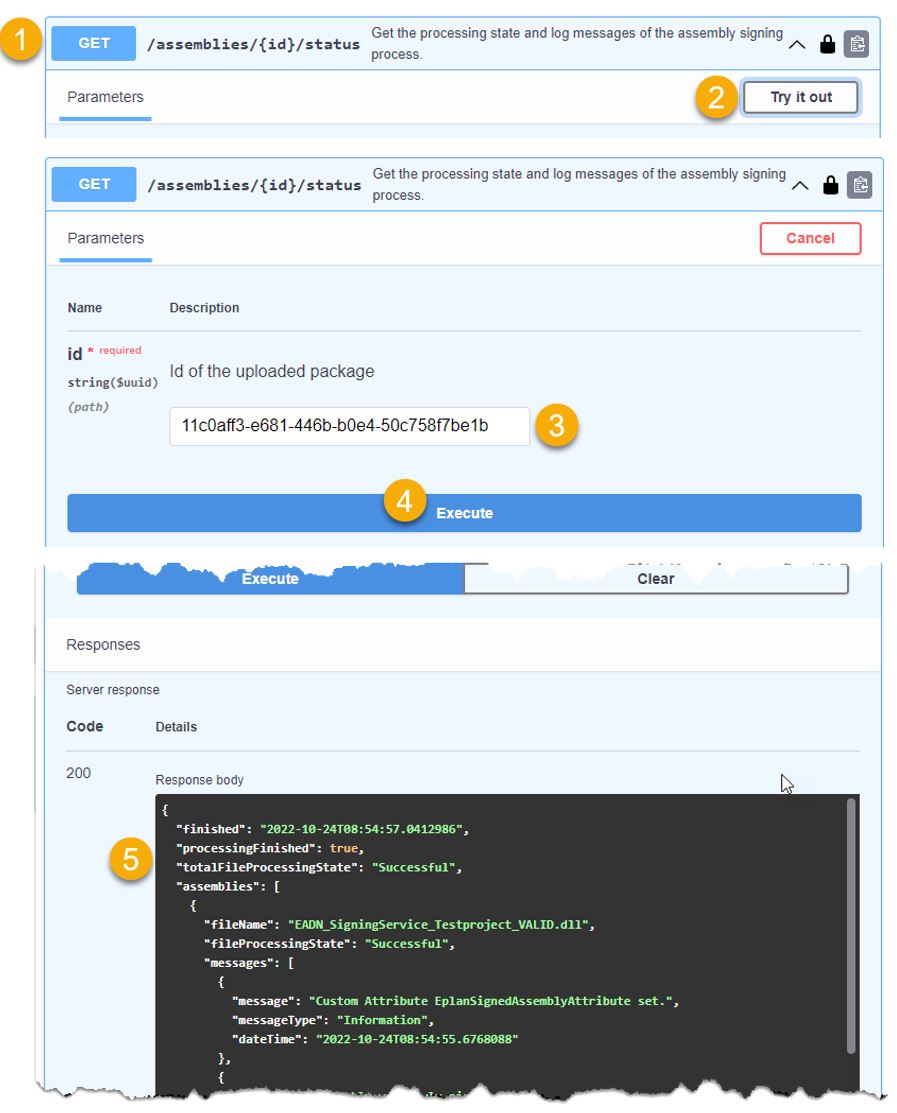
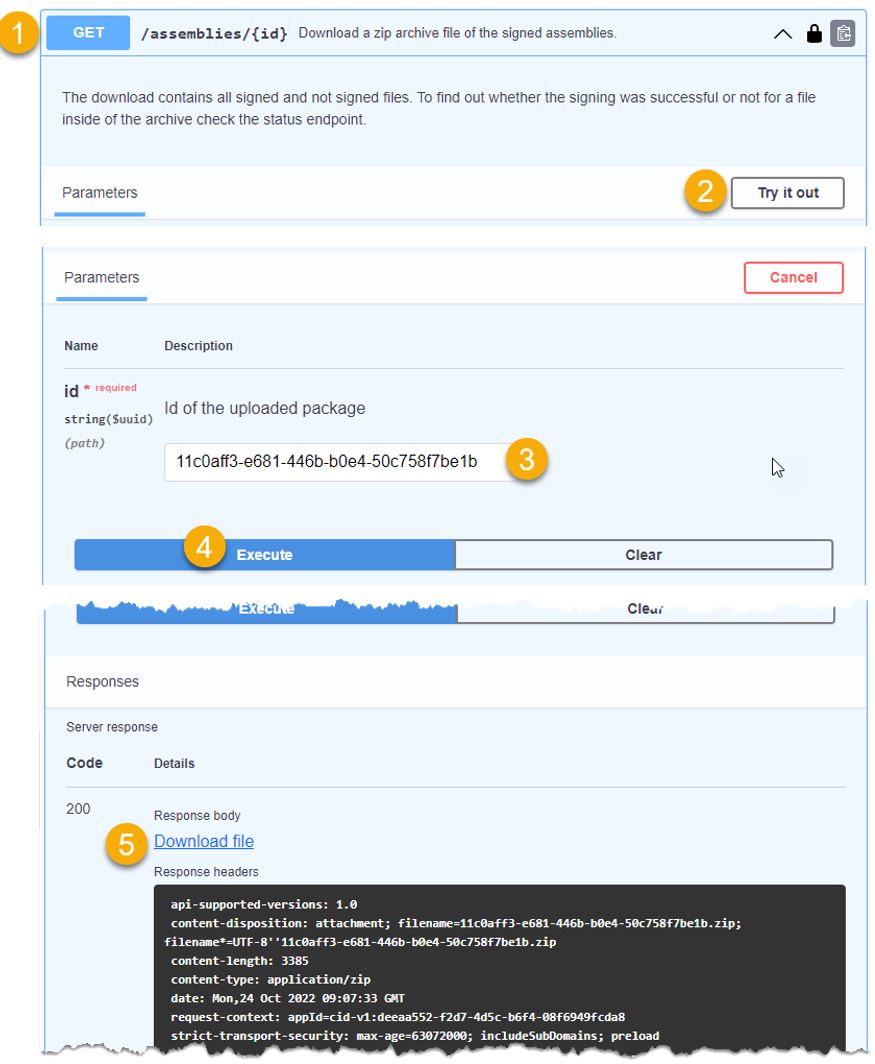
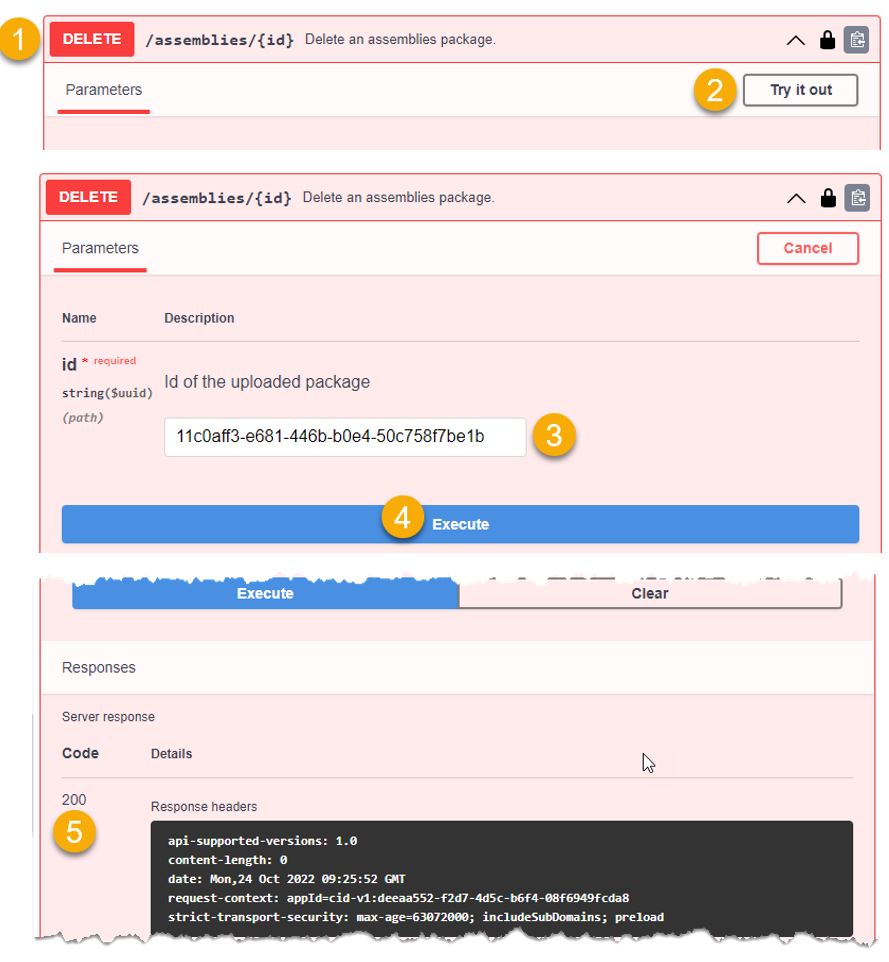
Make sure you have the ID of the desired upload process handy (see also "Select and copy value of ID in Response body").
Log in to the EPLAN Cloud Developer Portal https://developer.eplan.com
If required, perform Authorize manual usage of EADN-Signing
Make sure you have the ID of the desired upload process handy (see also "Select and copy value of ID in Response body").
Log in to the EPLAN Cloud Developer Portal https://developer.eplan.com
If required, perform Authorize manual usage of EADN-Signing (see also "Limitations" below)
Make sure you have the ID of the desired upload process handy (see also "Select and copy value of ID in Response body")
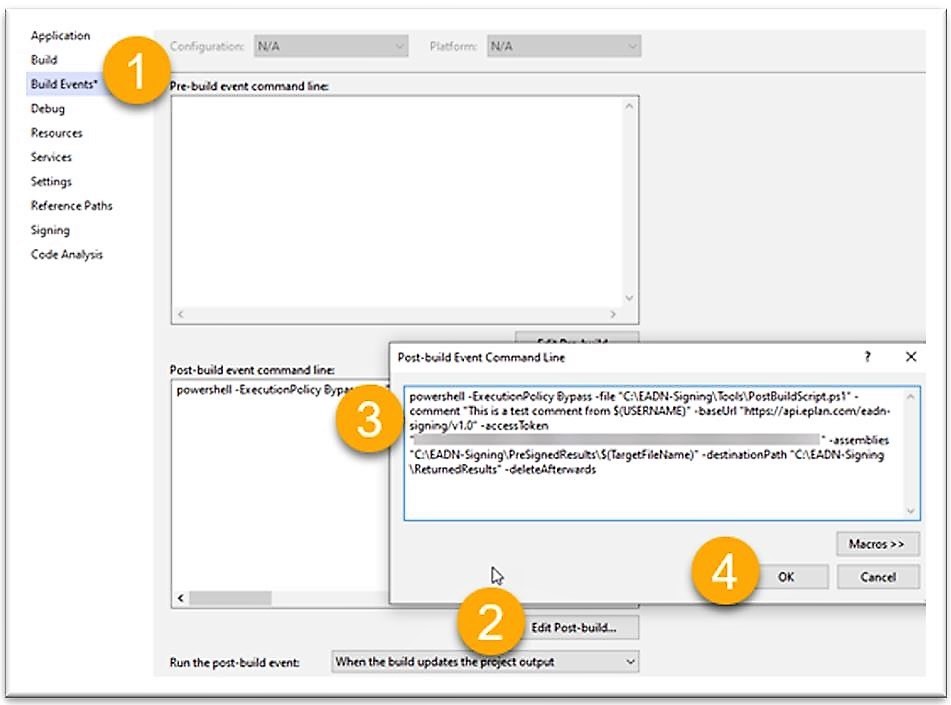
To take advantage of fully automated signing of assemblies during the build process of Visual Studio, you must create a personal access token (further called PAT) for the application EADN Signing inside the profile editor of your EPLAN Cloud organization.
See EPLAN Cloud help:
• Open My Settings
• Add personal access token (PAT)
• Roles and permissions
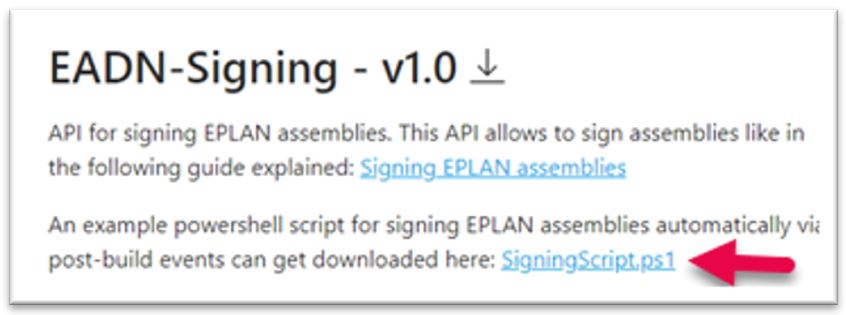
Download the provided PowerShell script from the Developer Portal
EADN Singing for using it in Post-build event of Visual Studio.
An example for calling the script including available parameters can be found inside the script itself:
|
Copy Code
|
|
|---|---|
# Example command line: # # powershell -ExecutionPolicy Bypass -file "<YourFolderName>\PostBuildScript.ps1" -comment "This is a test comment from $(USERNAME)" -accessToken "<YourPATforEADNSigningService>" -assemblies "<SourceFolderWithPreSignedFiles>\$(TargetFileName)" -destinationPath "<TargetFolder>" -deleteAfterwards |
|
| Parameter name | Mandatory | Description |
|---|---|---|
| baseUrl | No | Only for signing in Chinese environment; use parameter value*: https://api.epulse-eplan.cn/eadn-signing/v1.0 |
| comment | No | Comment for complete upload job |
| accessToken | Yes | PAT which was created in User profile |
| assemblies | Yes | Filename(s) of assemblies / executables which have to get signed |
| destinationPath | Yes | Local target folder for downloading result-package (via PowerShell script target directory is tried to get created if missing) |
| deleteAfterwards | No | Delete upload-job after tried signing automatically (Note: storage quota limitations) |
*current baseUrl can be viewed at any time in the Developer Portal
Output console will show details after building:
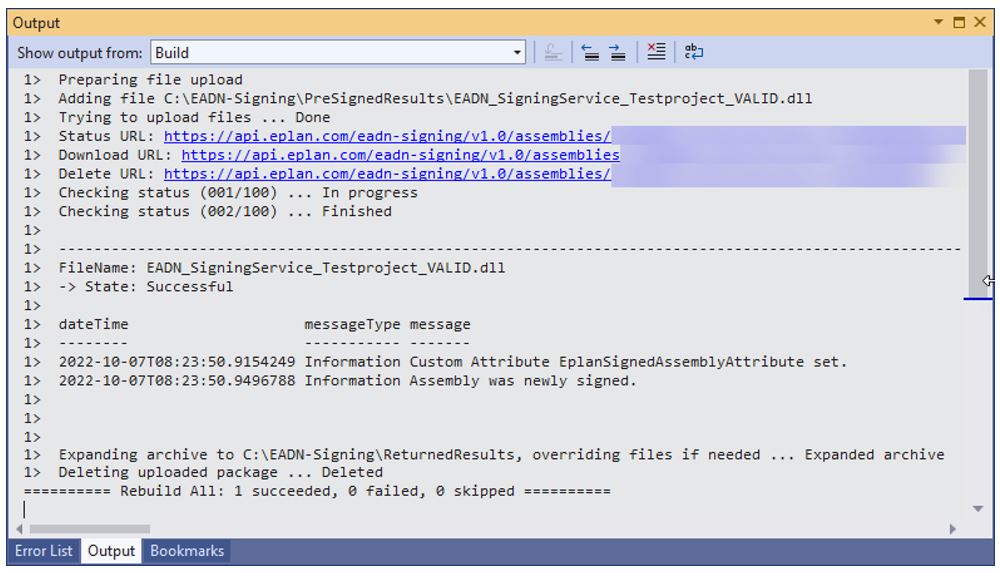
All files (no matter if singing process, was successful or not) will get extracted to given folder in parameter destinationPath
• The filenames in one upload have to be unique. Adding the same filename multiple times is not allowed, because it can not be reflected in the ZIP-file for download.
• Each upload job can have a max. total file size of ~40 MB
• There is an upload limit of max. 9999 kept upload jobs for each organization.
• No automatic “cleanup” is done in organization storage.
• If upload limit is reached, older uploaded files have to get deleted before new uploads are possible.
a) How to sign automatically generated serialization DLLs
If you use an automatically created serialization DLL for your classes, you need to delay-sign them via the sgen.exe tool. This tool can be found the SDK directory of your development environment.
b) Signing of your own COM interop DLLs
As you probably know, any strong-named .NET assembly can only reference / load other strong-named assemblies. In case your application registers COM DLLs, the development environment normally automatically creates so-called interop DLLs, which contain the .NET wrapping of the respective COM methods. Normally, these DLLs are not signed. To create these assemblies in an already delay-signed way Microsoft provides the command line tool tlbimp.exe – also to be found in the SDK directory of your development environment. See the following example, how it is used:
As an old alternative to the "Upload files manually" step, you can use the outdated but still working method of uploading via EPLAN File Exchange:
You need the login data of your account for the EPLAN file exchange web site and the main administrator of your EPLAN cloud organization will get informed about new entitlement for using the cloud-based EADN Signing service.
Create one or several ZIP archives containing all the assemblies to be signed. Please take into account that the zip files may not be password-protected.
Log in to the EPLAN file exchange portal at https://service.eplan.de/exchange with the login data mentioned above.

Select the software project for which the assemblies should be signed. The project has to be the same as the one for which you received and used the respective public key.

Now upload the zip file to our server by clicking Upload one file, selecting the zip file and clicking Upload. This triggers the signing process.

As soon as your files have been signed you will receive an email that you can download the ready-signed files again from our file exchange portal. Log in again and find your files under "My downloads". The ZIP file contains an additional log file with a message, whether the signing was successful or not. In case the signing procedure failed, the log file will contain further information about the problem.
In case of any problems with signing, please write to EPLAN API Support: support-eplan@eplan.de.
